
1.0 OBJECTIVE:
To
lay down the operating procedure of Electronic Analytical Weighing Balance CBK Series-8H Adam.
2.0 SCOPE:
This
shall be applicable to the Electronic Analytical Weighing
Balance CBK Series-8H Adam of Quality Control Instrument Laboratory.
3.0 RESPONSIBILITY:
3.1
Supervisor/
Machine operator.
3.2
Production
Pharmacist.
4.0 ACCOUNTABILITY:
4.1
Manager-Production.
5.0 MATERIAL AND
EQUIPMENT:
5.1
Electronic Analytical Weighing Balance CBK Series-8H Adam.
5.2
Sample.
6.0 PROCEDURE:
6.1
Operation:
6.1.1
Make sure that the
balance/scale is already properly set up.
6.1.2
Level the scale by
adjusting the four feet. The scale should be adjusted such that the bubble in
the spirit level is in the center of the level and the scale is supported by
all four feet.
6.1.3
Attach the power
cable to the connection on the base on left of the scale. Plug in the power
cable to the main
6.1.4
Switch on the
power switch located on the base on the night side of the scale.
6.1.5
The scale will
first display the software revision then run a self-test. At the end of the
self-test it will display zero weight when a stable condition has been
achieved.
6.1.6
Before performing
weighing assures that, balance is calibrated.
6.1.7
Zero the scale by
pressing the [Zero]. The zero
indicator will be on. Place a container on the pan and its weight will be
displayed.
6.1.8
Press [Tare] when the reading is stable.
6.1.9
After taring,
place the sample in the container. The display will show the weight and the
unit of weight currently in use.
6.1.10
Auto power off can
be set by the user. So it will power off automatically.
6.1.11
Switch off the
mains when the balance is not in use.
6.2
Precautions:
6.2.1
Install the
balance on a vibration free place.
6.2.2
Check all the
circuits before use.
6.2.3
If during or
before weighing power supply fails, then recalibrate the balance.
6.2.4
Do not blow air
into the chamber under any circumstances.
6.2.5
Never press or
touch the weighing pan during weighing.
7.0 REVISION LOG:
Revision No.
|
Effective Date
|
Reason
|
00
|
New
SOP
|
8.0 REFERENCES:
8.1
Not Applicable.
9.0 ANNEXURES:
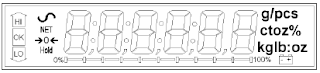
Annexure
1: Overview
of Display and Operating Elements
Annexure:
1
OVERVIEW
OF DISPLAY AND OPERATING ELEMENTS
Overview
of Display and Operating Elements

|
10.0
ABBREVIATIONS:
Abbreviation
|
Expanded Form
|
SOP
|
Standard operating
procedure
|
&
|
And
|
No.
|
Number
|
Ltd.
|
Limited
|
F
|
Format
|
g
|
Grams
|


.webp)


